Proper lithium battery maintenance can extend the service life by 2-3 times and avoid 80% of common faults. This article introduces the core technologies and methods of lithium battery maintenance in detail, from basic maintenance to professional repair, to help you solve problems such as over-discharge, faulty cells and protection boards. Whether you are an electric car enthusiast, a DIY expert or a professional maintenance worker, this guide can help you save maintenance costs and improve battery performance.
Last updated: May 2025 | Estimated reading time: 15 minutes
This article will answer your questions:
- How to perform daily lithium battery maintenance to extend its service life
- Special maintenance points for lithium batteries in applications such as electric bicycles and golf carts
- Safe activation and recovery methods for over-discharged batteries
- Identification and treatment technology of faulty batteries
- Protection board failure diagnosis and replacement guide
- Selection and use of professional maintenance tools
Table of Contents
ToggleBasic knowledge of lithium battery maintenance
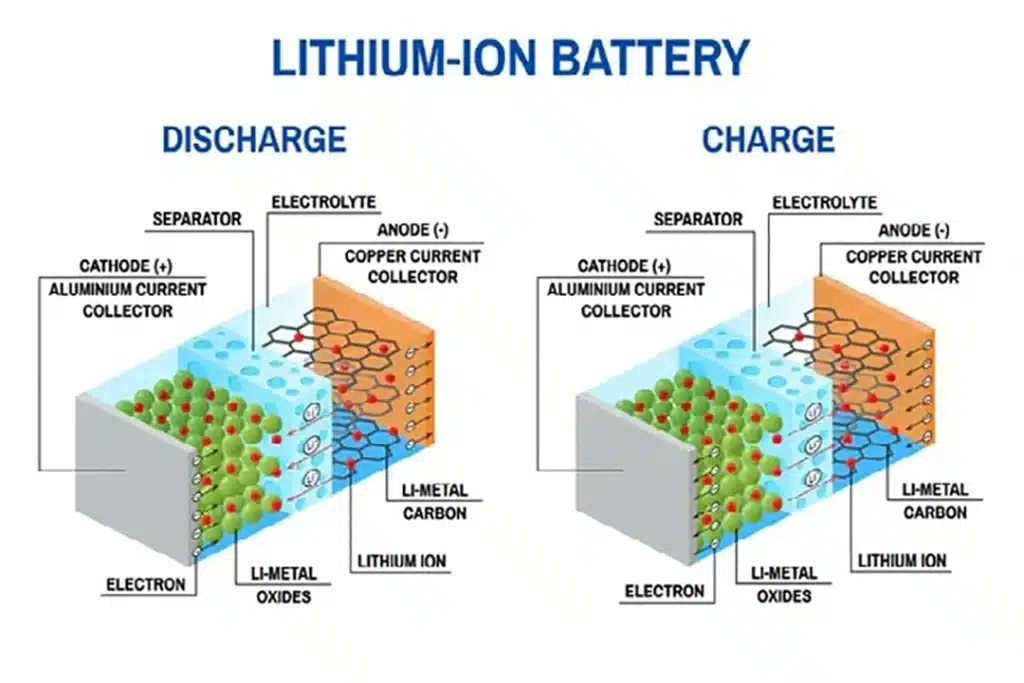
The basis of lithium battery maintenance is to understand the working principle of the battery and the correct usage habits. Lithium-ion batteries are different from traditional lead-acid batteries. They have no memory effect, but are more sensitive to charging methods and usage environments. Proper daily maintenance can extend the battery life by 2-3 times, saving a lot of replacement costs.
The life of lithium batteries is mainly affected by the charging and discharging method, temperature and frequency of use. Most lithium batteries will drop below 80% of their original capacity after 500-1000 complete charge and discharge cycles. But with proper maintenance, you can significantly slow down this process. Understanding the basic structure of lithium batteries – including positive electrode materials, negative electrode materials, electrolytes and separators – will help you better maintain them.
There are several types of lithium batteries, each with unique maintenance requirements:
| Battery Type | Advantages | Disadvantages | Maintenance Focus |
|---|---|---|---|
| Ternary Lithium Battery | High Energy Density, Lightweight | Poor Thermal Stability | Temperature Control, Avoid Over-Discharge |
| Lithium Iron Phosphate Battery | High Safety, Long Cycle Life | Low Energy Density | Balanced Charging, Prevent Cell Imbalance |
| Lithium Manganese Oxide Battery | Low Cost, High Discharge Rate | Short Cycle Life | Avoid Deep Discharge, Gentle Charging |
| Lithium Titanate Battery | Fast Charging, High Safety | Low Energy Density, High Cost | Control Charge Current, Prevent High Temperature |
The core principle of lithium-ion battery maintenance is to control the use environment and charging and discharging habits:
- Avoid full discharge (less than 20% capacity) and overcharge (more than 90%). Use the original or matching charger and avoid fast charging. Perform full charge and discharge cycles regularly (after every 20-30 partial charges).
- Avoid using or storing in extreme temperatures (optimal range: 15-25°C). Avoid direct sunlight or near heat sources. If the battery becomes hot during use, stop using and let it cool.
- Charge to 40-60% before long-term storage. Check and recharge every 3 months and store in a dry, cool place.
One electric bicycle user successfully used a battery with an expected lifespan of 2 years for more than 5 years by controlling the charging within the range of 40-80% and storing the battery indoors in winter, with the capacity still remaining at more than 85% of the original level.
Lithium battery fault diagnosis method
The first step in lithium battery troubleshooting is to identify the symptoms and perform a systematic inspection using the appropriate tools. Most lithium battery problems can be initially diagnosed by measuring voltage, internal resistance, and capacity. Proper troubleshooting not only identifies the problem, but also avoids unnecessary repair attempts.
Battery failures are usually manifested as reduced capacity, abnormal charging, shortened discharge time, or a complete inability to charge. The diagnostic process should be from the outside in, first checking the external connections and charger, and then analyzing the battery itself. When performing diagnostics, safety is always the primary consideration – especially when dealing with physically damaged batteries.
Basic diagnostics can be done using simple tools:
- Voltage measurement: Use a multimeter to measure the total voltage and single cell voltage. A voltage that is too low (<2.8V) indicates over-discharge or damage, and a voltage that is too high (>4.3V) indicates a charging control problem.
- Internal resistance measurement: Use an internal resistance tester or advanced multimeter. A difference of more than 20% in internal resistance of batteries from the same batch indicates a problem. An increase in internal resistance is an indicator of aging or damage.
- Capacity assessment: After fully charging, connect a load to discharge, record the time required for complete discharge, and compare it with the original specification (usually, extra attention is required when it drops below 80%).
| Fault Symptom | Possible Cause | Diagnosis Method | Solution Direction |
|---|---|---|---|
| Cannot Charge | Protection Board Sleep/Locked | Measure Voltage at Charging Terminal and Cell | Reset or Activate Protection Board |
| Short Discharge Time | Reduced Capacity/Cell Imbalance | Capacity Test/Compare Individual Cell Voltages | Balance Charging/Address Faulty Cell(s) |
| Unstable Voltage | Poor Connection/Cell Failure | Apply Load and Observe Voltage Change | Repair Connection/Replace Cell(s) |
| Overheating During Charge | High Internal Resistance/Charger Issue | Temperature Monitoring/Charger Inspection | Reduce Charging Current/Replace Charger |
Safety precautions during battery troubleshooting:
- Physical inspection: First check the appearance of the battery to look for signs of swelling, leakage or deformation.
- Isolation operation: Test in a ventilated area, away from flammable materials.
- Appropriate tools: Use insulated tools to avoid the risk of short circuit.
- Warning signs: If there is an odor, abnormal sound or rapid temperature rise, stop the inspection immediately.
A maintenance technician received a power tool battery that could not be charged. Through system measurement, he found that the single cell voltage was seriously unbalanced (the difference was 0.8V). After inspection, it was found that the solder joint was loose, resulting in poor connection. After a simple re-soldering, the battery returned to normal, avoiding unnecessary battery replacement.
Activation and rescue of over-discharged batteries
Over-discharged lithium batteries can be safely restored through special activation techniques, but caution is required. When the lithium battery voltage is below 2.5V, most protection circuits will cut off the charging path, causing standard chargers to fail to work. The correct activation process can wake up these “dormant” batteries and avoid safety risks caused by incorrect operation.
Excessive discharge will not only cause the battery capacity to decrease, but may also cause changes in the internal chemical structure and corrosion of the copper foil. Not all deeply discharged batteries can be successfully activated, but according to practical experience, batteries with a voltage above 2.0V usually have a 70-80% chance of recovery and are worth trying to rescue.
Detailed steps for safe activation:
- Initial assessment: Measure the total voltage and single cell voltage to confirm that the battery has no physical damage such as swelling, leakage, etc. Single cells with voltages below 1.0V may be permanently damaged.
- Prepare for activation: select a power supply with adjustable current (the initial current should be small, about 0.1C), ensure ventilation of the working environment, prepare fire extinguishing equipment, and prepare temperature monitoring equipment (such as infrared thermometer).
- Small current activation: directly connect the positive and negative poles of the battery (skip the protection board), set a low current (50-200mA), limit the voltage, monitor the temperature, which should not exceed 45°C, and continue until the single cell voltage reaches 3.0V.
- Resume normal charging: After activation, connect the equalizing charger and perform a complete charge and discharge cycle to verify whether the protection circuit functions normally.
Key security control points during activation:
- Continuous monitoring: The activation process must be supervised and must not be left unattended.
- Temperature control: If the battery temperature exceeds 45°C, immediately suspend charging.
- Time limit: A single activation should not exceed 30 minutes, and the battery should be allowed to cool before continuing.
- Current control: The activation current should not exceed 0.2C of the battery’s nominal capacity.
- Observe the reaction: If there is any odor, smoke or abnormal noise, stop immediately.
| Voltage Range (V) | Recoverability | Recommended Activation Method | Success Rate |
|---|---|---|---|
| 2.5 – 3.0 | Very Good | Standard Low Current Activation | >95% |
| 2.0 – 2.5 | Good | Phased Low Current Activation | 70-80% |
| 1.5 – 2.0 | Moderate | Professional Equipment Activation + Evaluation | 40-60% |
| < 1.5 | Poor | Consider Direct Replacement | <30% |
Solution for single faulty battery cell
When a faulty cell appears in a lithium battery pack, it can be repaired by reducing the number of cells in series or parallel rather than replacing a single cell. Single cell failure in a lithium battery pack is one of the most common problems, and the correct treatment method depends on the series-parallel structure of the battery pack and the location of the faulty cell. Although this repair method will reduce the total capacity or voltage of the battery pack, it can significantly extend the overall battery life.
The main reason why lithium battery cells are difficult to replace individually is the consistency problem. The difference in internal resistance, capacity and self-discharge rate between new and old cells will lead to serious imbalance, reduce overall performance and increase safety risks. The series reduction method and parallel reduction method are more practical and safe solutions by removing problematic cells and maintaining the consistency of the remaining cells.
The two methods are suitable for different scenarios:
Reduced series method:
- Applicable situations: Single cell failure in a series battery pack.
- Implementation method: Remove a group of series cells to reduce the total voltage.
- Result impact: The total voltage is reduced, but the capacity remains unchanged.
- Subsequent adjustment: The protection board needs to be replaced or reconfigured to match the new voltage.
Subtractive parallel method:
- Applicable situations: Single cell failure in a parallel battery pack.
- Implementation method: Remove a group of parallel cells to reduce the total capacity.
- Result impact: The total capacity is reduced, but the voltage remains unchanged.
- Subsequent adjustment: Usually there is no need to replace the protection board, but the capacity needs to be re-marked.
Faulty cell identification and removal steps:
- Precise positioning: Use a multimeter to measure the voltage of all cells/groups, perform internal resistance measurement, load test to observe the voltage drop, and thermal imaging to detect abnormal hot spots.
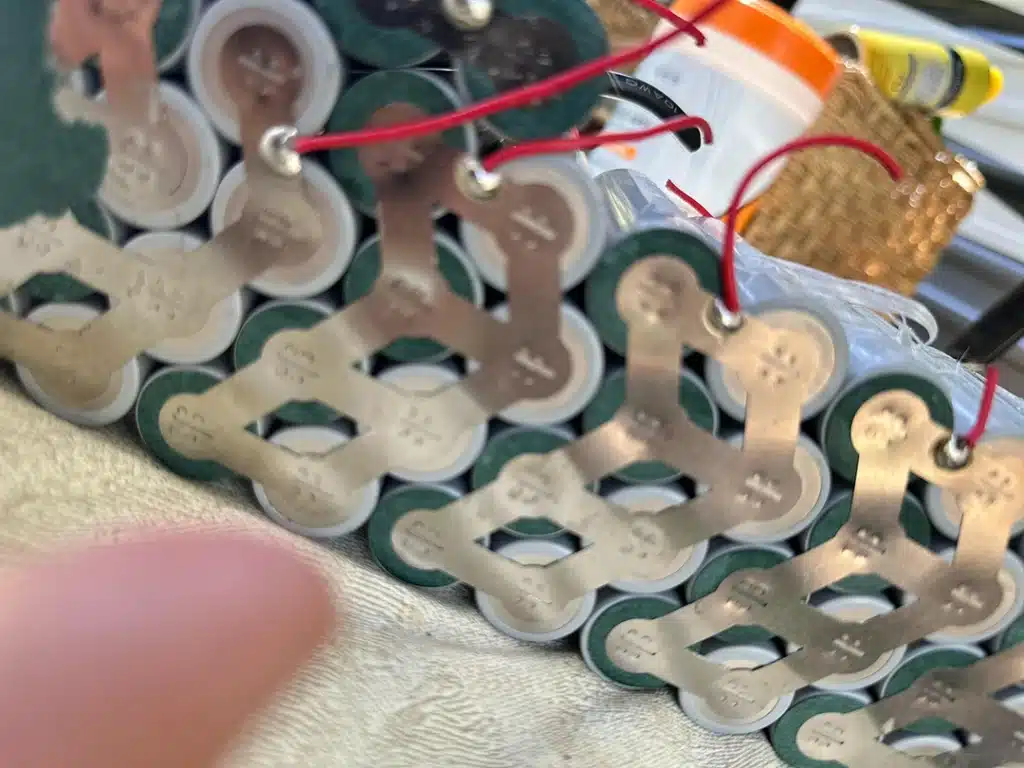
- Safe removal: Record the original connection method, discharge to a safe voltage (about 3.0-3.3V/cell), use the correct tool (such as a spot welder) to disconnect, and retain the original solder joints for subsequent reconnection.
- Reconnection: Reconnect the cells according to the new structure, ensure that all connection points are firm and well insulated, add necessary equalizing wires, and test the total voltage to confirm the connection is correct.
Reconditioned battery evaluation and optimization.
| Evaluation Item | Method | Acceptance Criteria | Optimization Measures |
|---|---|---|---|
| Voltage Balance | Measure Individual Cell Voltages | Difference < 50mV | Balance Charging |
| Capacity Test | Full Discharge Test | ≥ 80% of Rated Capacity | Multiple Charge/Discharge Cycles |
| Temperature Uniformity | Thermal Imaging Under Load | Temperature Difference < 5°C | Improve Heat Dissipation/Adjust Load |
| Protection Function | Overcharge/Over-Discharge Test | Protection Points Trigger Accurately | Adjust or Replace BMS |
In a 7-series 2-parallel power tool battery pack, one group of cells had abnormal voltage and high internal resistance. The technicians used the reduction method to remove the problematic group and reconfigured it to 7-series 1-parallel. Although the capacity was reduced by half, the battery pack worked stably for more than 200 cycles, giving the user enough time to purchase a replacement. Click to learn about Hongyitai 18650 7S2P 4Ah battery pack products.
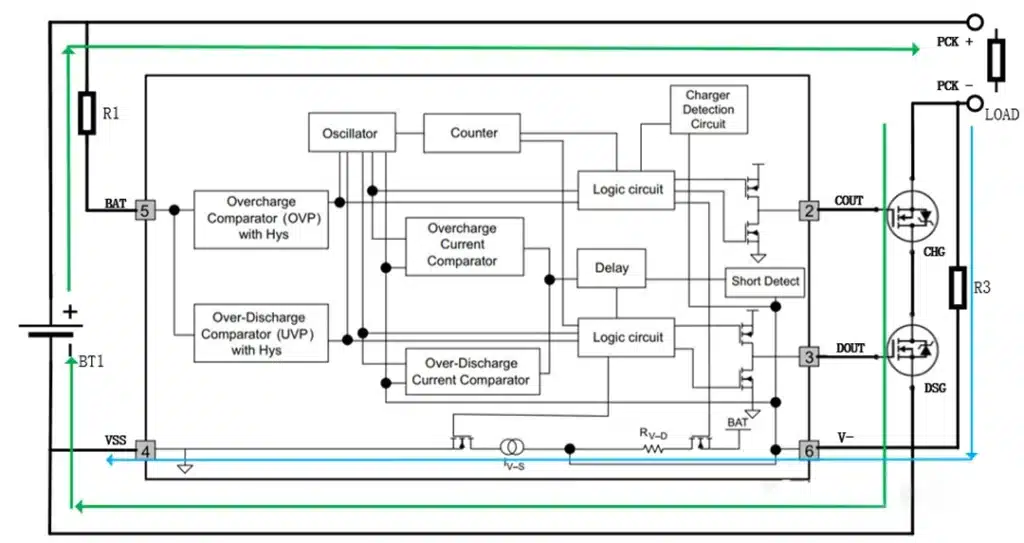
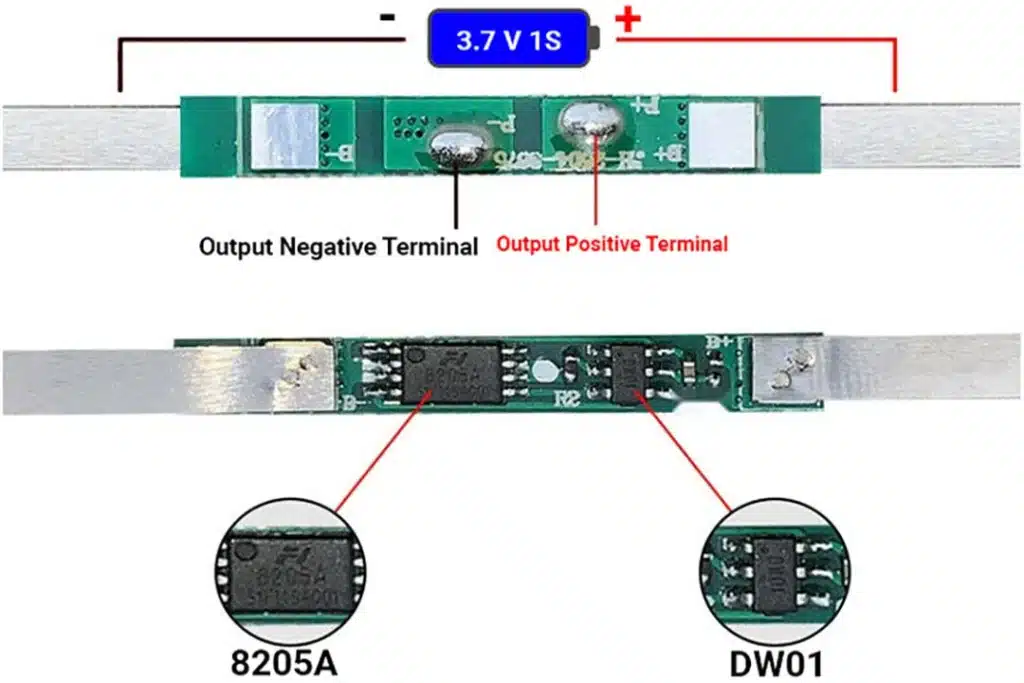
Protection board replacement and adjustment technology
There are two common types of protection boards on the market: custom string number (fixed parameters) protection boards and adjustable protection boards. Choosing the right type of protection board depends on your technical capabilities, budget, and battery application scenarios. Regardless of the type, it is crucial to ensure that the protection board parameters are fully matched to the battery pack. Incorrect protection parameters can lead to over-protection (affecting use) or under-protection (safety risk).
Key factors for choosing the right protection board:
- Basic parameters of battery pack: Number of series connections (S): determines the operating voltage range. Number of parallel connections (P): affects the maximum operating current. Battery chemical composition: affects the overcharge/over-discharge protection point.
- Electrical specification matching: Operating voltage range: must cover the battery pack voltage, Maximum continuous current: should be greater than 1.2 times the system’s maximum operating current, Short circuit protection current: usually 2-3 times the maximum operating current, Overcharge/over-discharge protection point: set according to the battery chemical characteristics.
- Functional requirements considerations: Balancing function: key to long-term stability, temperature protection: essential for high-power applications, communication function: required for intelligent system integration.
Installation and configuration of different types of protection panels.
Fixed series protection board (red board):
- Strictly select the corresponding protection board according to the number of battery strings
- Confirm that B+/B- are connected to the total positive and negative poles of the battery pack
- Connect the balancing line in the order of the number of strings (make sure there is no wrong connection)
- Test the trigger points of each protection function after installation
Adjustable protection plate (blue board):
- Adjust the sampling cable according to the actual number of battery strings
- Configure overcharge/overdischarge protection parameters (if necessary)
- Set the equalization trigger voltage (usually 4.0-4.2V)
- Verify the configuration parameters and test the function
Intelligent protection board:
- Set working parameters through the software interface
- Configure monitoring thresholds and alarm points
- Set communication protocols and transmission frequencies
- Fully test various protection functions and data reporting
| Symptom | Possible Cause | Diagnostic Method | Solution |
|---|---|---|---|
| Frequent Power Off | Overly Strict Protection Points | Measure Voltage/Current at Power Off | Adjust Protection Parameters |
| Over-Discharge Without Protection | Protection Point Set Too Low | Observe Discharge Cut-Off Voltage | Raise Over-Discharge Protection Point |
| Balancing Not Working | Incorrect Balancing Wire Connection | Observe Individual Cell Voltages at Full Charge | Check and Reconnect Balancing Wires |
| Communication Error | Damaged Interface/Program Error | Check with Communication Test Software | Update Firmware/Replace Board |
Professional protection board configuration skills:
- Balance current selection: Large-capacity battery packs need to choose high balance current (>50mA) models
- Temperature sensor placement: It should be placed at the hottest position of the battery pack to ensure accurate monitoring
- Waterproof treatment: The protection board used outdoors should be waterproof/moisture-proof
- Seismic design: Mobile device batteries need to consider the protection board fixation and seismic design
- Heat dissipation considerations: In high-current applications, the protection board MOSFET needs sufficient heat dissipation space
An electric scooter enthusiast needed to replace the protection board because the battery pack was reduced from 10S to 9S. He chose an adjustable smart protection board, which not only perfectly matched the new number of strings, but also provided real-time battery status monitoring through Bluetooth connection, and the user experience was better than the original system.
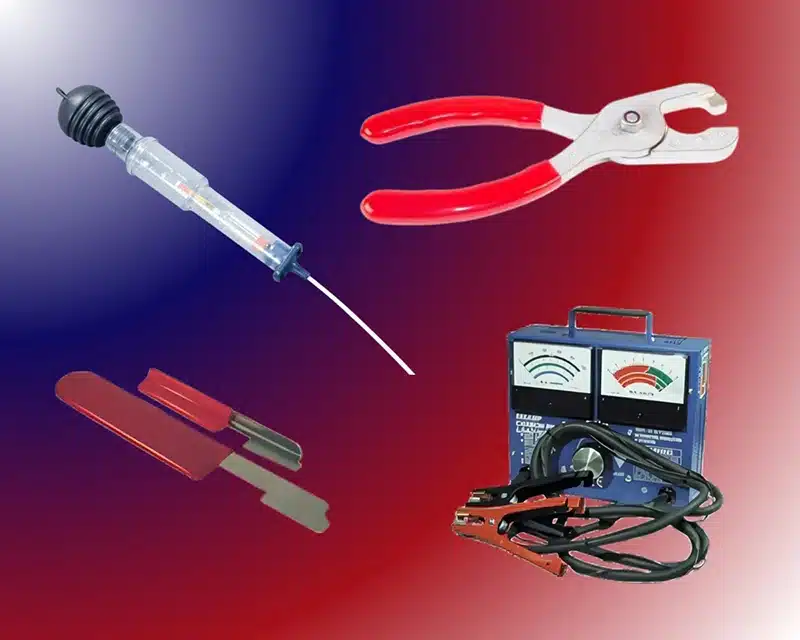
Essential tools for lithium battery maintenance
The tool investment should match your repair needs. For users who occasionally repair personal equipment, a basic tool set is enough to handle most situations. Professional repair personnel, on the other hand, need more comprehensive equipment to improve efficiency and handle complex problems. No matter how much you invest, safety tools should always be the first investment item.

Basic measurement tools:
- High-precision digital multimeter (accuracy ≥ 0.5%)
- Infrared thermometer (non-contact)
- Battery internal resistance tester (ideal configuration)
- DC electronic load (for capacity testing)
Safe operation equipment:
- Insulated gloves and protective glasses
- Flame-retardant work mats
- Lithium battery fireproof bags
- Dry powder fire extinguisher (for Class B fires)
Connection and repair tools:
- Spot welder (recommended, better than soldering iron)
- High quality soldering iron (alternative)
- Nickel sheet/pure nickel strip (0.1-0.2mm thick)
- Insulating tape (polyimide/Kapton preferred)
| Tool Category | Key Metrics | Recommended Specifications | Price Range (USD) |
|---|---|---|---|
| Multimeter | Accuracy, DC Voltage Range | ±0.5% Accuracy, 0-100V Range | $30-200 |
| Internal Resistance Meter | Measurement Range, Accuracy | 0.01-100mΩ, ±1% | $50-300 |
| Spot Welder | Power, Adjustment Precision | 1000W+, Fine Adjustment | $300-2000 |
| Balancing Charger | Supported Series (Cells), Balancing Current | 2-16S, >50mA Balancing Current | $80-500 |
| Battery Analyzer | Test Accuracy, Data Logging | ±1% Accuracy, Chart Recording | $200-1000 |
A battery repair enthusiast initially used only a multimeter and an ordinary soldering iron, with a repair success rate of only about 40%. After investing in a professional spot welder and an equalizing charger, the success rate increased to over 85%, and the operating safety was greatly improved, proving the significant impact of professional tools on repair quality.
The latest lithium battery technology development and trends in 2025
In 2025, the most significant change in the lithium battery industry is the popularity of repair-friendly designs. More and more manufacturers are beginning to consider the repairability of batteries, making it easier to replace individual cells and repair BMS.
Solid-state electrolyte technology: New solid-state electrolyte materials have greatly improved battery safety and life, but require special maintenance methods.
Self-healing electrodes: Electrode materials containing special polymers can self-repair microscopic cracks and delay capacity decay.
Conclusion
Start with basic maintenance and establish scientific charging and discharging habits, storage methods, and usage patterns. When encountering a problem, first perform a system diagnosis to identify the fault and then choose the appropriate repair plan. For complex situations, investing in appropriate tools and learning relevant knowledge will bring long-term returns.
Above all, always put safety first. Lithium batteries have a high energy density and improper handling can have serious consequences. Follow safety guidelines, use the right tools, and seek professional help when necessary.
If you have any questions or needs regarding lithium batteries, please contact our technical team for professional advice or customized battery solutions. Visit https://safelith.com/ for more information.
FAQs
When lithium batteries have the following conditions, it is usually recommended to replace them rather than repair them: severe physical damage (such as puncture, obvious deformation), obvious chemical leakage, single cell voltage is less than 1.5V for more than one week, internal resistance is more than 3 times that of a new battery, or the cost of repair exceeds 50% of that of a new battery. Safety is always the primary consideration.
The biggest safety risks are short circuits and thermal runaway. Metal tools used during repairs can cause accidental short circuits, while incorrect charging parameters or physical damage can trigger a thermal runaway reaction, leading to a fire. Always use insulated tools, work on fireproof surfaces, and prepare appropriate firefighting equipment.
Typical symptoms of BMS failure include: the battery cannot be charged but the cell voltage is normal, charging is interrupted, the battery pack voltage is normal but cannot be discharged, the cell voltage is seriously unbalanced (difference>0.3V), or the protection function fails. Diagnosis can be performed by measuring the voltage at key points of the BMS or using a dedicated tester.